本文详细讲解 KVM 虚拟机如何利用 network namespace 实现网络隔离与通信。通过创建虚拟网桥和 veth 设备,在宿主机上构建隔离网络环境,确保虚拟机安全高效运行。
在宿主机中,借助 network namespace 完成两个虚拟机隔离模式下的通信。
实验前准备
# 取消默认 NAT 网络模式
mv /etc/libvirt/qemu/networks/default.xml /etc/libvirt/qemu/networks/default.xml_bak
sudo systemctl restart libvirtd
# 创建虚拟网桥
brctl addbr br0
brctl addbr br1
brctl show
# 创建虚拟网络空间
ifconfig br0 up
ifconfig br1 up
ip netns add ns1
ip netns list
# 创建虚拟机vm1并连接至br0
sudo virt-install --name=vm1 --ram=512 --vcpus=1 --cdrom=ubuntu-16.04-server-amd64.iso --network=bridge=br0,model=virtio --disk path=/var/lib/libvirt/images/vm1.qcow2,size=5,bus=virtio,format=qcow2
# 同上创建虚拟机vm2并连接至br1
# 确认虚拟机已经连接上各自的桥设备
brctl showvm1 —> br0 —> ns1
创建一对 veth,将 net-in 一端添加到 br0 中,将 net-out 一端添加到 ns1 中
ip link add net-in type veth peer name net-out
ifconfig net-in up
ifconfig net-out up
brctl addif br0 net-in
brctl show

ip link set dev net-out name eth0 netns ns1
ip netns exec ns1 ifconfig
vm2 —> br1 —> ns1
操作同上
ip link add net1-in type veth peer name net1-out
ifconfig net1-in up
ifconfig net1-out up
brctl addif br1 net1-in
brctl show

ip link set dev net1-out name eth1 netns ns1
ip netns exec ns1 ifconfig
确认网络拓扑图
$ brctl show
bridge name	bridge id		STP enabled	interfaces
br0		8000.2626b5397cd4	no		net-in
							vnet0
br1		8000.da1a03447025	no		net1-in
							vnet1

$ ip netns exec ns1 ifconfig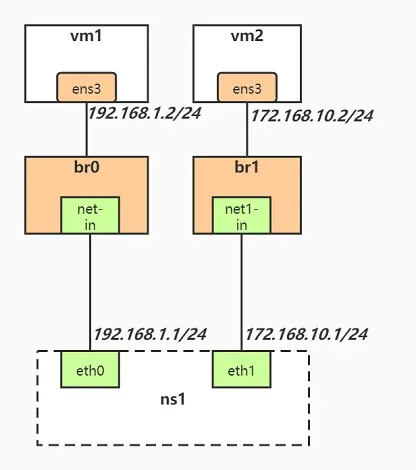
配置 IP 并测试
ip 地址配置如下:
vm1 - ens3 : 192.168.1.2
ns1 - eth0 : 192.168.1.1

vm2 - ens3 : 172.168.10.2
ns1 - eth1 : 172.168.10.1
当宿主机开启了网络转发功能,虚拟网络空间才会开启,在以上场景中,必须开启网络转发功能:
$ sysctl -w net.ipv4.ip_forward=1
net.ipv4.ip_forward = 1
vm1 —> br0 —> ns1
vm1 - ens3 网络配置
virsh console vm1
ifconfig lo up
ifconfig ens3 192.168.1.2/24 up
ifconfig ens3
ns1 - eth0 网络配置
ip netns exec ns1 ifconfig lo up
ip netns exec ns1 ifconfig eth0 192.168.1.1/24 up
ip netns exec ns1 ifconfig eth0
vm2 —> br1 —> ns1
vm2 - ens3 网络配置
virsh console vm2
ifconfig lo up
ifconfig ens3 172.168.10.2/24 up
ifconfig ens3
ns1 - eth1 网络配置
ip netns exec ns1 ifconfig eth1 172.168.10.1/24 up
ip netns exec ns1 ifconfig eth1
为虚拟机指定路由
# vm1:
virsh console vm1
ping 192.168.1.1 -c 1
ip route add default via 192.168.1.1

# vm2:
virsh console vm2
ping  172.168.10.1 -c 1
ip route add default via 172.168.10.1
连通性测试
ping 192.168.1.2 -c5 -R
PING 192.168.1.2 (192.168.1.2) 56(124) bytes of data.
64 bytes from 192.168.1.2: icmp_seq=1 ttl=63 time=0.609 ms
RR: 	172.168.10.2
	192.168.1.1
	192.168.1.2
	192.168.1.2
	172.168.10.1
	172.168.10.2

64 bytes from 192.168.1.2: icmp_seq=2 ttl=63 time=0.715 ms	(same route)
64 bytes from 192.168.1.2: icmp_seq=3 ttl=63 time=0.925 ms	(same route)
64 bytes from 192.168.1.2: icmp_seq=4 ttl=63 time=0.880 ms	(same route)
64 bytes from 192.168.1.2: icmp_seq=5 ttl=63 time=0.826 ms	(same route)

--- 192.168.1.2 ping statistics ---
5 packets transmitted, 5 received, 0% packet loss, time 4008ms
rtt min/avg/max/mdev = 0.609/0.791/0.925/0.114 ms
试验成功 🎉