本文详细介绍 Open vSwitch (OVS) 环境中如何实现流量镜像,包括端口镜像、VLAN 镜像的配置方法与实验。通过 OVS 镜像功能,轻松实现网络流量监控与分析。
本文介绍在 Open vSwitch 环境中如何实现镜像。
镜像简介
镜像是指将经过指定端口(镜像端口)的报文复制一份到另一个指定端口(观察端口),在不影响对报文进行正常处理的情况下,通过网络监控分析观察端口复制的报文,就可以判断实际网络运行情况。 在应用镜像功能时,如果镜像过多,会占用较多转发带宽,可能影响其他业务转发。另外,如果镜像端口与观察端口的带宽不一致,比如镜像端口的带宽是 1000Mbit/s,观察端口的带宽是 100Mbit/s,则有可能导致观察端口因带宽不足而不能及时转发全部的镜像报文,发生丢包情况。 镜像方向是指将镜像端口指定方向的报文复制到观察端口。
- 入方向:将镜像端口接收的报文复制到观察端口上
- 出方向:将镜像端口发送的报文复制到观察端口上
- 双向:将镜像端口接收和发送的报文都复制到观察端口上
流镜像
流镜像是指在设备上配置一定的规则,将符合规则的特定业务流复制到观察端口进行分析和监控。
端口镜像
端口镜像是指设备复制从镜像端口流经的报文,并将此报文传送到指定的观察端口进行分析和监控 本地端口镜像: 指观察端口与监控设备直接相连,此时观察端口被称为本地观察端口。 远程端口镜像: 指观察端口与监控设备通过中间网络传输镜像报文,此时观察端口被称为远程观察端口。
- 二层远程端口镜像是指远程观察端口与监控设备通过一个二层网络相连。以二层远程端口镜像为例,镜像报文的具体转发过程如下:
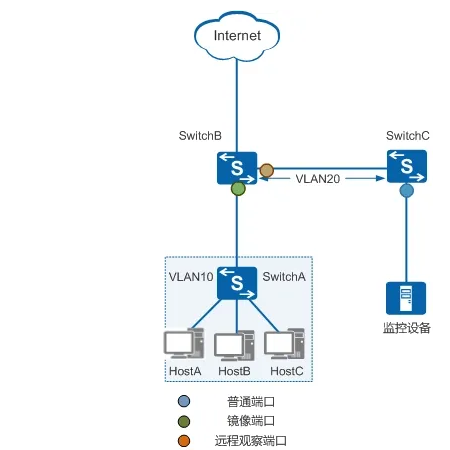
- 镜像端口将流经的原始报文复制到远程观察端口。
- 远程观察端口收到镜像端口复制过来的镜像报文,在原来的 VLAN 标签(VLAN10)外层再添加一层 VLAN 标签(VLAN20),以便将镜像报文向中间二层网络转发。
- SwitchC 在接收到远程观察端口发来的镜像报文后,就将镜像报文向监控设备转发。为了实现这一步,需要将中间二层设备(SwitchC)与远程观察端口、监控设备相连的端口加入 VLAN20,保证 SwitchB、SwitchC 与监控设备间能够二层通信。
VLAN镜像
VLAN 镜像是指将指定 VLAN 内所有活动接口的报文镜像到观察端口,用户可以对某个 VLAN 或者某些 VLAN 内的报文进行监控。 VLAN 镜像也分为本地 VLAN 镜像和远程 VLAN 镜像,远程 VLAN 镜像中,主机所在 VLAN 和用于转发镜像报文的中间二层网络的 VLAN 不能相同。
OVS 上实现镜像
OVS上实现端口镜像的基本流程如下:
- 创建 mirror,在 mirror 中指定镜像数据源及镜像目的地
- 将创建的 mirror 应用到 bridge 中
镜像数据源可以通过下面几个选项来指定:
- select_all:布尔值,设置为 true 时,进出该 mirror 所生效的每个数据包都将被镜像
- select_dst_port:从该 port 离开的数据包将会被镜像
- select_src_port:从该 port 进入的数据包将会被镜像
- select_vlan:指定特定 VLAN 做为数据源,整个 VLAN 的数据包都会镜像到目的地
镜像目的地可以用下面选项来指定:
- output_port: 将数据包镜像到特定的 port
- output_vlan: 将数据包镜像到指定 VLAN, 原始数据的 VLAN 标签会被剥掉。
实验
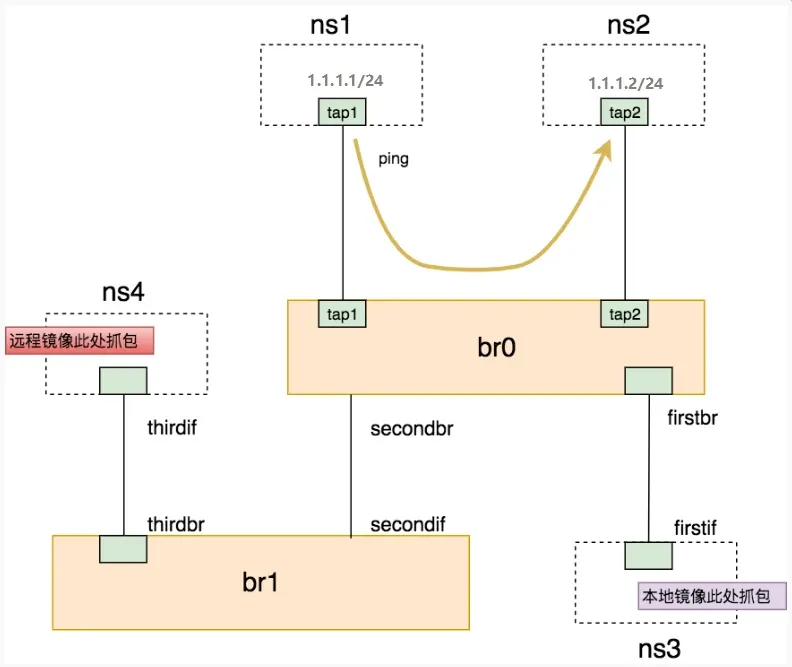
创建网络拓扑
ip netns add ns1
ip netns add ns2
ip netns add ns3
ip netns add ns4

ovs-vsctl add-br br0
ovs-vsctl add-br br1

ovs-vsctl add-port br0 tap1 -- set Interface tap1 type=internal
ip link set tap1 netns ns1
ip netns exec ns1 ip addr add 1.1.1.1/24 dev tap1
ip netns exec ns1 ip link set tap1 up
ip netns exec ns1 ip link set lo up

ovs-vsctl add-port br0 tap2 -- set Interface tap2 type=internal
ip link set tap2 netns ns2
ip netns exec ns2 ip addr add 1.1.1.2/24 dev tap2
ip netns exec ns2 ip link set tap2 up
ip netns exec ns2 ip link set lo up

ip link add firstbr type veth peer name firstif
ip link add secondbr type veth peer name secondif
ip link add thirdbr type veth peer name thirdif

ovs-vsctl add-port br0 firstbr
ip link set firstif netns ns3

ovs-vsctl add-port br0 secondbr
ovs-vsctl add-port br1 secondif

ovs-vsctl add-port br1 thirdbr
ip link set thirdif netns ns4

ip netns exec ns3 ip link set firstif up
ip netns exec ns4 ip link set thirdif up
ip link set firstbr up
ip link set secondbr up
ip link set secondif up
ip link set thirdbr up
本地端口镜像
将ns1 ping ns2的双向流量镜像到 ns3
ovs-vsctl -- --id=@tap1 get port tap1
          -- --id=@firstbr get port firstbr
          -- --id=@m create mirror name=mirror0 select-dst-port=@tap1 select-src-port=@tap1 output-port=@firstbr
          -- set bridge br0 mirrors=@m
ns1 ping ns2 (tap1: 1.1.1.1-> tap2: 1.1.1.2)
$ ip netns exec ns1 ping -c3 1.1.1.2
PING 1.1.1.2 (1.1.1.2) 56(84) bytes of data.
64 bytes from 1.1.1.2: icmp_seq=1 ttl=64 time=0.596 ms
64 bytes from 1.1.1.2: icmp_seq=2 ttl=64 time=0.125 ms
64 bytes from 1.1.1.2: icmp_seq=3 ttl=64 time=0.122 ms
在 firstif 上抓包可以看到成功获得 tap1 到 tap2 双向的 ICMP 响应数据包
$ sudo ip netns exec ns3 tcpdump -i firstif
tcpdump: verbose output suppressed, use -v or -vv for full protocol decode
listening on firstif, link-type EN10MB (Ethernet), capture size 262144 bytes
22:18:21.765662 IP 1.1.1.1 > 1.1.1.2: ICMP echo request, id 27011, seq 1, length 64
22:18:21.765934 IP 1.1.1.2 > 1.1.1.1: ICMP echo reply, id 27011, seq 1, length 64
22:18:22.779652 IP 1.1.1.1 > 1.1.1.2: ICMP echo request, id 27011, seq 2, length 64
22:18:22.779712 IP 1.1.1.2 > 1.1.1.1: ICMP echo reply, id 27011, seq 2, length 64
22:18:23.803625 IP 1.1.1.1 > 1.1.1.2: ICMP echo request, id 27011, seq 3, length 64
22:18:23.803682 IP 1.1.1.2 > 1.1.1.1: ICMP echo reply, id 27011, seq 3, length 64
远程 VLAN 镜像
设置 secondbr、secondif、thirdbr 为 vlan110
ovs-vsctl set port secondbr tag=110
ovs-vsctl set port secondif tag=110
ovs-vsctl set port thirdbr tag=110
关闭 vlan110 的 MAC 学习功能,避免影响正常网络转发
ovs-vsctl set bridge br0 flood-vlans=110
ovs-vsctl set bridge br1 flood-vlans=110将ns1 ping ns2的双向流量都 output 到 vlan110
ovs-vsctl -- --id=@tap1 get port tap1
          -- --id=@m create mirror name=mirror1 select-dst-port=@tap1 select-src-port=@tap1 output-vlan=110
          -- set bridge br0 mirrors=@m
ns1 ping ns2, 在 thirdif 上抓包可以看到成功获得 tap1 到 tap2 双向的 ICMP 响应数据包
sudo ip netns exec ns4 tcpdump -i thirdif
tcpdump: verbose output suppressed, use -v or -vv for full protocol decode
listening on thirdif, link-type EN10MB (Ethernet), capture size 262144 bytes
22:36:40.470133 IP 1.1.1.1 > 1.1.1.2: ICMP echo request, id 1179, seq 1, length 64
22:36:40.470472 IP 1.1.1.2 > 1.1.1.1: ICMP echo reply, id 1179, seq 1, length 64
22:36:41.499774 IP 1.1.1.1 > 1.1.1.2: ICMP echo request, id 1179, seq 2, length 64
22:36:41.499869 IP 1.1.1.2 > 1.1.1.1: ICMP echo reply, id 1179, seq 2, length 64
22:36:42.523710 IP 1.1.1.1 > 1.1.1.2: ICMP echo request, id 1179, seq 3, length 64
22:36:42.523787 IP 1.1.1.2 > 1.1.1.1: ICMP echo reply, id 1179, seq 3, length 64
也可以添加另一个镜像规则,将 vlan110 来的数据包都镜像到 vlan110
ovs-vsctl -- --id=@m create mirror name=mirror3 select-vlan=110 output-vlan=110
          -- set bridge br1 mirrors=@m
清除实验环境
清除镜像配置
ovs-vsctl clear bridge br0 mirrors
ovs-vsctl clear bridge br0 flood_vlans

ovs-vsctl clear bridge br1 mirrors
ovs-vsctl clear bridge br1 flood_vlans
清除网络拓扑
ip link del firstbr type veth peer name firstif
ip link del secondbr type veth peer name secondif
ip link del thirdbr type veth peer name thirdif

ovs-vsctl del-br br0
ovs-vsctl del-br br1
ip netns del ns1
ip netns del ns2
ip netns del ns3
ip netns del ns4