Open vSwitch QoS
本文主要介绍 Open vSwitch 中 QoS 的应用和实现方法。
✉️ 免费订阅更新
订阅我的免费通讯,第一时间获取生成式 AI 领域优质内容
我承诺保护您的隐私,不会向第三方分享您的信息。
您可以随时取消订阅。
QoS
对于控制一台机器的网络 QoS,分两个方向,一个是入方向,一个是出方向,能控制的一般只有出方向,通过 Shaping,将出的流量控制成自己想要的模样,而进入的方向是无法控制的(不过可以变通,通过 ingress qdisc 策略将入口流量重定向到虚拟网卡,然后对的 egress 进行出口限速,从而变通实现入口流控),只能通过 Policy 将包丢弃。
- Policy
通过简单的丢包机制实现入口流量(ingress)速率的限制,它既可以作用于物理接口,也可以作用于虚拟接口。 - Shaping
作用于接口上的出口流量(egress),可以实现多个 QoS 队列,不同队列里面处理不同策略。
控制策略
在 Linux 下,可以通过 TC(traffic control)控制网络的 QoS,主要就是通过队列的方式。
无类别排队规则(Classless Queuing Disciplines)
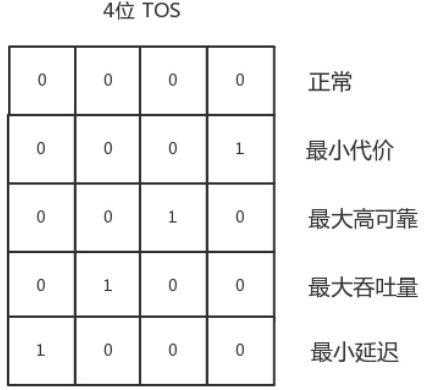
默认为 pfifo_fast,是一种不把网络包分类的一种技术。pfifo_fast 分为三个先入先出的队列,称为三个 Band,根据网络包里面 TOS,看这个包到底应该进入哪个队列。其中 Band 0,1,1 优先级依次降低。TOS 总共四位,每一位表示的意思不同,总共十六种类型,和 0 到 2 对应起来,表示不同的 TOS 对应的不同的队列。
1
2
$ tc qdisc show dev enp4s0
qdisc pfifo_fast 0: root refcnt 2 bands 3 priomap 1 2 2 2 1 2 0 0 1 1 1 1 1 1 1 1随机公平队列(Stochastic Fair Queuing)
会建立很多的 FIFO 队列,TCP Session 会计算 hash 值,通过 hash 值分配到某个队列。在队列的另一端,网络包会通过轮询策略从各个队列中取出发送,这样不会有一个 Session 占据所有的流量。如果两个 Session 的 hash 是一样的,会共享一个队列,也有可能互相影响。hash 函数会经常改变,从而不会总是相互影响。令牌桶规则(TBF,Token Bucket Filte)
基于类别的队列规则(Classful Queuing Disciplines)
典型的为分层令牌桶规则( HTB , Hierarchical Token Bucket),下面的实验就采用这个方案。
OVS 中如何控制 QoS
QoS 功能的实现是在 Linux 内核中,OVS 只是能够配置部分 OVS 支持的 QoS 类型,如果需要一些不支持的 QoS 类型,可以通过 patch 来支持这些配置,也可以通过传统的 TC 工具直接进行 QoS 的策略配置。
创建网络拓扑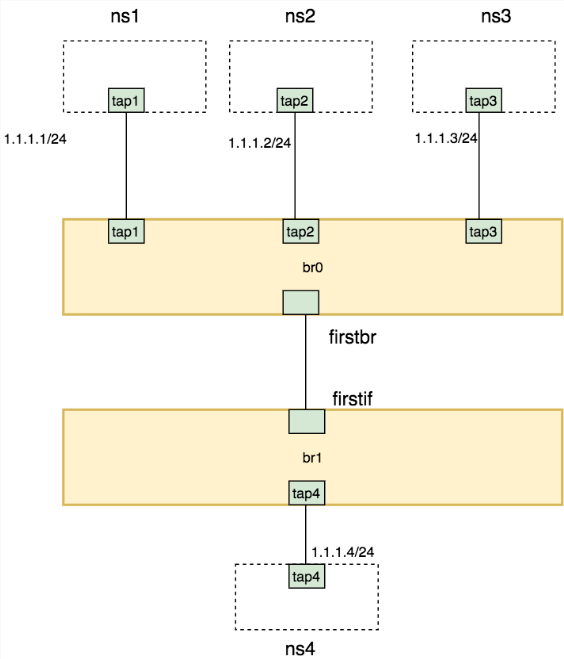
1 | ip netns add ns1 |
ingress
对于进入的流量,可以设置 Ingress policy
ingress_policing_rate:为接口最大收包速率,单位kbps,超过该速度的报文将被丢弃,默认值为0表示关闭该功能;
ingress_policing_burst:为最大突发流量大小,单位kb。默认值0表示1000kb;这个参数最小值应不小于接口的 MTU,通常设置为ingress_policing_rate 的 10% 更有利于 tcp 实现全速率。
1 | ovs-vsctl set Interface firstif ingress_policing_rate=1000000 |
清除接口速率限制方法
1 | ovs-vsctl set Interface firstif ingress_policing_rate=0 |
egress
首先,在 firstbr 端口上创建了一个 QoS 规则,对应三个 queue
1 | ovs-vsctl set port firstbr qos=@newqos \ |
查看 br0 中的端口信息(交换机对应的 dpid,以及每个端口的 OpenFlow 端口编号,端口名称,当前状态等等),进入 br0 的网络包,要通过设置流表规则,匹配后进入不同的队列。
1 | ovs-ofctl show br0 |
测试验证
分别测试 ns1,ns2,ns3 到 ns4 的带宽时,每个都是能够打满带宽
1
2
3
4
5
6
7
8$ ip netns exec ns4 iperf -s -i 1
$ ip netns exec ns1 iperf -c 1.1.1.4 -i 1 -t 30
...
[ ID] Interval Transfer Bandwidth
[ 4] 0.0- 1.0 sec 1.14 MBytes 9.60 Mbits/sec
[ 4] 1.0- 2.0 sec 1.14 MBytes 9.57 Mbits/sec
[ 4] 2.0- 3.0 sec 1.14 MBytes 9.56 Mbits/sec
...如果 ns1 和 ns2 一起测试,发现带宽粗略比例为 3:1,但是占满了总的流量,没有发包的 ns3 有 60% 的带宽被借用了
1
2
3
4
5
6
7$ ip netns exec ns4 iperf -s -i 1
$ ip netns exec ns1 iperf -c 1.1.1.4 -i 1 -t 30
$ ip netns exec ns2 iperf -c 1.1.1.4 -i 1 -t 30
...
[ 4] 16.0-17.0 sec 912 KBytes 7.47 Mbits/sec
[ 5] 9.0-10.0 sec 250 KBytes 2.05 Mbits/sec
...在 ns1,ns2,ns3 中同时发包测试,发现是粗略( 10Mbps 限速的测试误差较大,可能是由于软件和网络环境问题引起,暂时忽略这些误差)按照 3:1:6 的比例进行的,正是配置的队列带宽比
1
2
3
4
5
6
7
8
9
10
11
12
13
14
15$ ip netns exec ns4 iperf -s -i 1
$ ip netns exec ns1 iperf -c 1.1.1.4 -i 1 -t 30
$ ip netns exec ns2 iperf -c 1.1.1.4 -i 1 -t 30
$ ip netns exec ns3 iperf -c 1.1.1.4 -i 1 -t 30
...
[ 6] 4.0- 5.0 sec 113 KBytes 927 Kbits/sec
[ 5] 6.0- 7.0 sec 148 KBytes 1.22 Mbits/sec
[ 4] 8.0- 9.0 sec 761 KBytes 6.23 Mbits/sec
[ 6] 5.0- 6.0 sec 100 KBytes 822 Kbits/sec
[ 5] 7.0- 8.0 sec 277 KBytes 2.27 Mbits/sec
[ 4] 9.0-10.0 sec 792 KBytes 6.49 Mbits/sec
[ 6] 6.0- 7.0 sec 197 KBytes 1.61 Mbits/sec
[ 5] 8.0- 9.0 sec 342 KBytes 2.80 Mbits/sec
[ 4] 10.0-11.0 sec 703 KBytes 5.76 Mbits/sec
...
清除实验环境
1 | ip link del firstbr type veth peer name firstif |
参考链接
Open vSwitch QoS